As the programmatic media space is constantly evolving, advertisers are always on the lookout for new ways to enhance their bidding strategies and optimize their media budgets. One of these new innovative ways is Custom Bidding, an outcome-based buying functionality available in Display and Video 360 (DV360). In this quick tutorial – which I hope will turn into a series – I want to tell you a bit more about custom bidding and teach you how to write a custom bidding script in-console. Let’s get started!
What is custom bidding?
Custom Bidding is an outcome-based buying functionality in DV360 that allows an advertiser to write a custom script that defines how much an impression is worth based on a specific criteria. Let me un-pack this, as it can be quite confusing. Normally, you would select one of the standard bidding strategies – “Maximize Clicks” or “Maximize Conversions”. In that case, DV360 will bid higher for impressions that are more likely to bring you clicks and conversions. With custom bidding however, you can go beyond a single conversion and create a multi-layered bid. For example, you can assign different weight to each conversion in your funnel or bid differently based on a value received in a custom variable. In other words, you can fine-tune and supercharge your bidding strategy to the smallest detail!
What are some real-life use cases and examples?
- Weighted Floodlight Conversions. The most common case here would be a long application funnel. Imagine you have a form that takes 3-4 steps on different pages before it is completed. You have floodlights on each page, but you do not have enough conversions further down the funnel, so you cannot optimize against your “application complete”. With custom bidding, you can assign each step of the application a different weight and optimize against all of these floodlights simultaneously. No minimum thresholds needed. You are just adding context, so the Google algorithm knows which step you value the most.
- Custom Floodlight Variables. If you are a car manufacturer and want to optimize differently for each car model selected (maybe their cost of product varies) in the online build & price tool, this is your best option. You can pass the car models into a custom variable and then assign it different weights in the custom bidding script.
- Floodlight Sales Revenue. If you are eCommerce CPG company that sells products online, you can bid against the revenue parameter being tracked by a Floodlight Sales tag.
- Google Analytics 360 Goals. This was just a dream a year ago, but now it is a reality. You can connect GA360 to DV360 and optimize your campaign against a GA Goal!!!
How to create and test your custom bidding script in DV360?
Time Needed : 15 minutes
In this tutorial, you are going to learn the process of how to create a custom bidding algorithm, assign a valid script and then test your entire build.
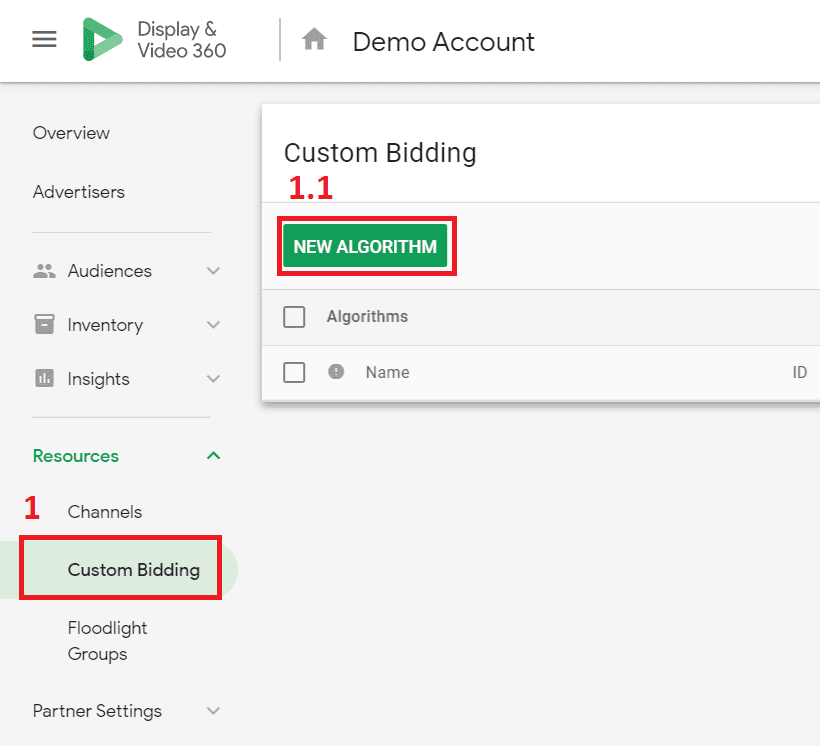
Login to your DV360 account. Navigate to the “Partner” (little house icon), then expand the “Resources” menu and click on “Custom Bidding”.
1.1 The “Custom Bidding” panel is on the right side and all your algorithms will be stored there. You can click on “New Algorithm” to create your first one.
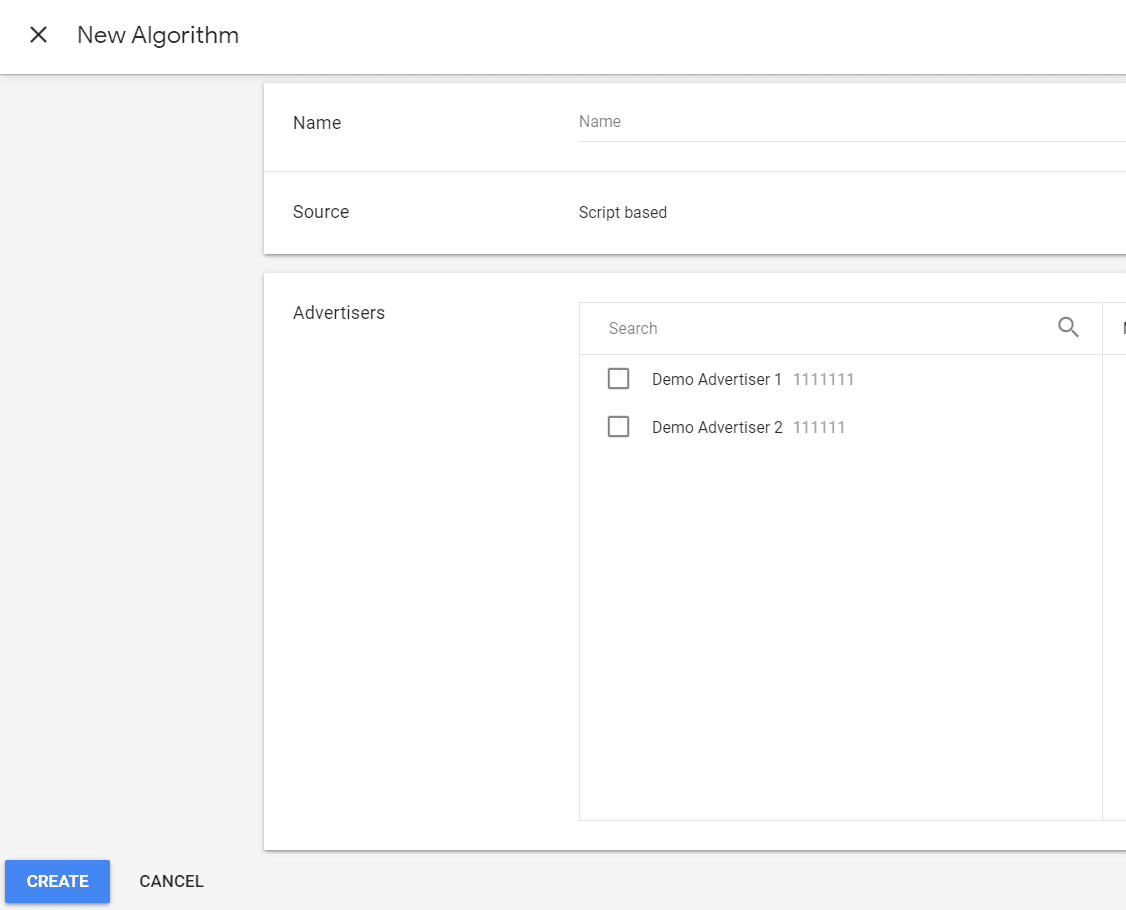
Once the “New Algorithm” window opens, then you will have to specify a “Name” and select the “Advertisers” this algorithm will be assigned to. Then click “Create”.
It is important to mention that there is a limit of 10 algorithms per advertiser, therefore only select the advertiser that will be using the script. If you run out of algorithm slots, you can always archive old ones.
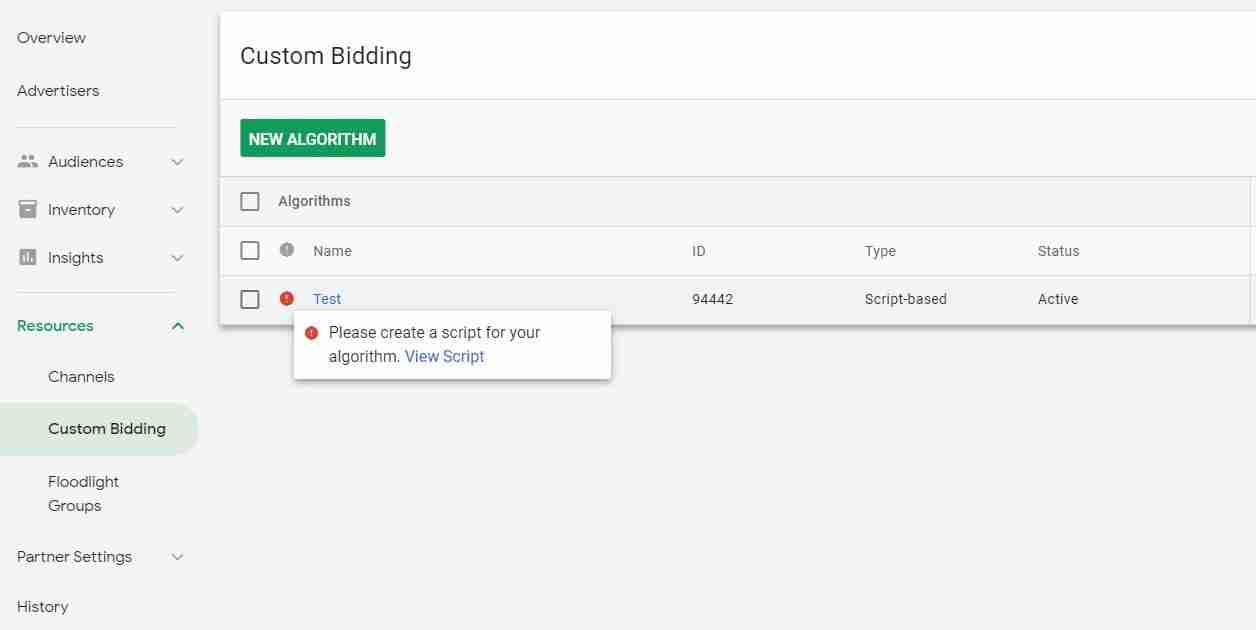
When you create the algorithm shell, you will be directed back to the main “Custom Bidding” panel. You will have to click on the algorithm again.
Here is why! You will see a red warning circle next to your algorithm. This is simply because there is no script assigned that provides the logic for the custom bidding.
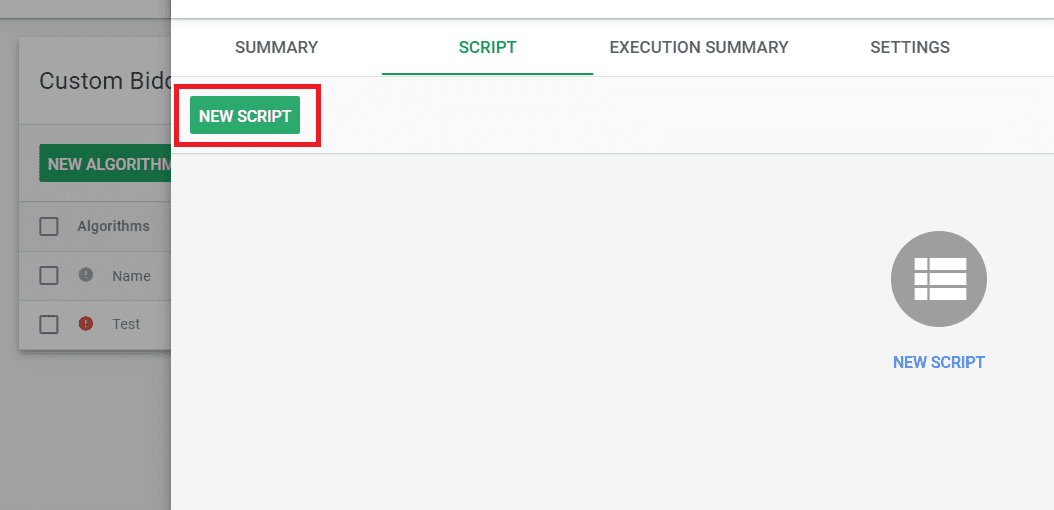
In the top tab select “Script” (will explore the rest of the tabs later) and click on “New Script”.
Before you begin your scrip writing process, it is worth mentioning that Custom Bidding is NOT compatible with the following formats: Gmail, YouTube, Twitter, Audio, Tag Guaranteed, or Programmatic Guaranteed inventory.
This is the most important part! With some basic knowledge of Python, you can write any type script and assign different weights to user actions (ad click, conversion, cart revenue and etc.). Furthermore, the scripts can be validated and tested in real-time!
5.1 When you are writing your script, you can always click on the “Check Syntax” button. If you have no errors in your script, you will see a green checkmark with a message “Syntax verified”. If there are errors, the validator will share more information with you and point you to the row(s) where the mistake has occurred.
5.2 You have to select the advertiser which you want to test your script against.
5.3 This is the sampling method you need to choose in order to test the logic of your script against historical data. there are a few options you can choose:
– All impressions: This will include all impressions for the advertiser and provide you with an overall expected distribution of impression values.
– Only impressions with clicks: If your script involves clicks then you would want to use this option.
– Only impressions with conversions: Most common one if you are using weighted conversions or GA goals. This includes all conversion events in your advertiser, and will be based off the default attribution model.
5.4 Click on “Test Script” and you will get a performance summary for a sample of 10,000 impressions obtained in the last 30 days.
5.5 Once you “Create” the script, you might not see it appear immediately in the “Script” tab/list. However, that is perfectly normal, it can take up to 20min for the script to load, then all warnings will disappear.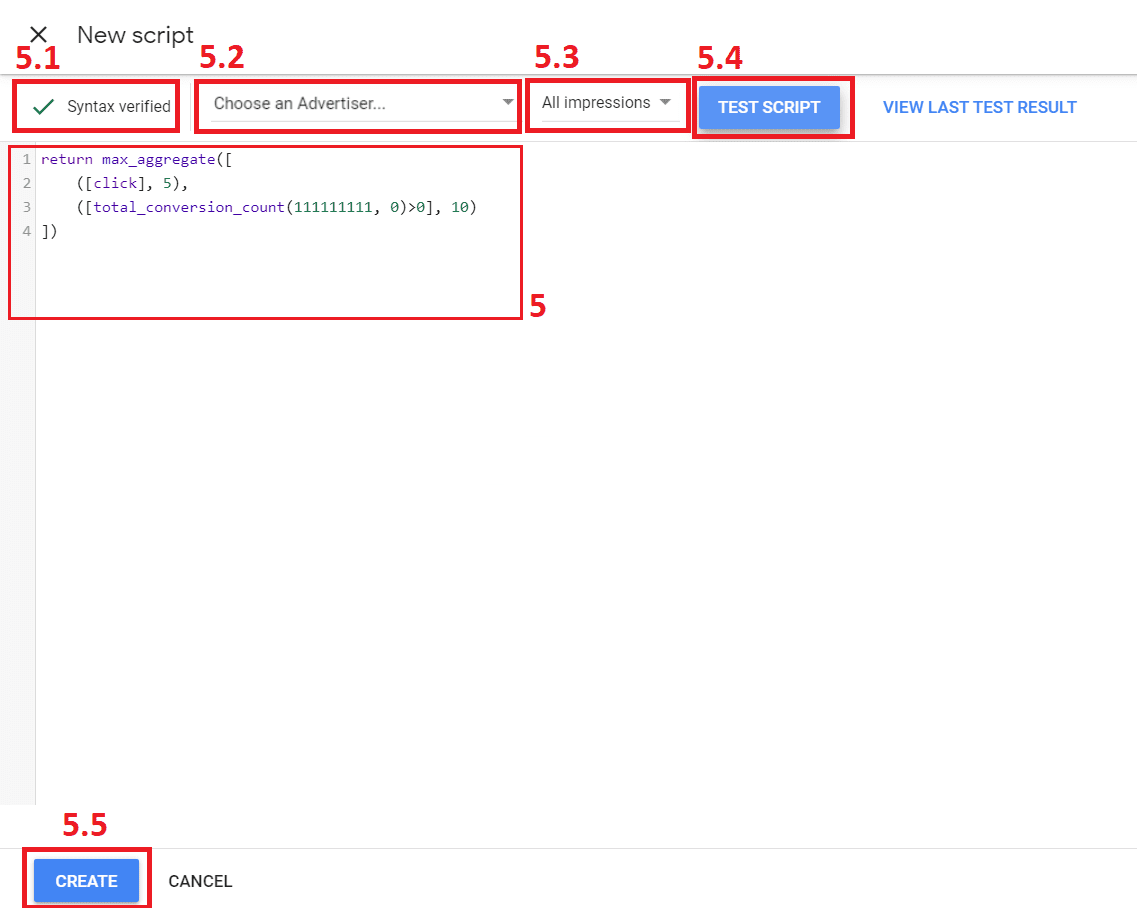
You can navigate to the “Summary” tab, where you are going to find all the important diagnostics about your Custom Bidding algorithm.
6.1 Once again, you would have to “Choose an Advertiser…” to see the relevant metrics against it:
– AVG impression value by cost: When assigned to a campaign, the Custom Bidding algorithm optimizes for ROAS as defined by your Custom Impression Value (the actions in the script) divided by the Cost (your media spend). The higher this value is the better, as this means you are getting more of the actions described in the scrip at a lower cost.
– Number of impressions with values >0: These are the impressions that scored positively against your script. For example, if you have given a specific weigh to a conversion in that script and you have 50 conversions from that type, then you will have 50 positively scored impressions. Therefore, make sure you have enough volume of positively scored impressions are Google has two fairly strict data requirements.
-> At least 1,000 positively-scored impressions for an Advertise.
-> At least 50 positively-scored impressions for an individual Line Item (LI)
6.2 All custom bidding algorithms require prior scored impressions (within the advertiser) to train a model, more specifically 30 days window of data. Therefore, you may have to wait a bit before using your algorithm as a bidding strategy. When ready, the “Status” will switch from Training to Ready.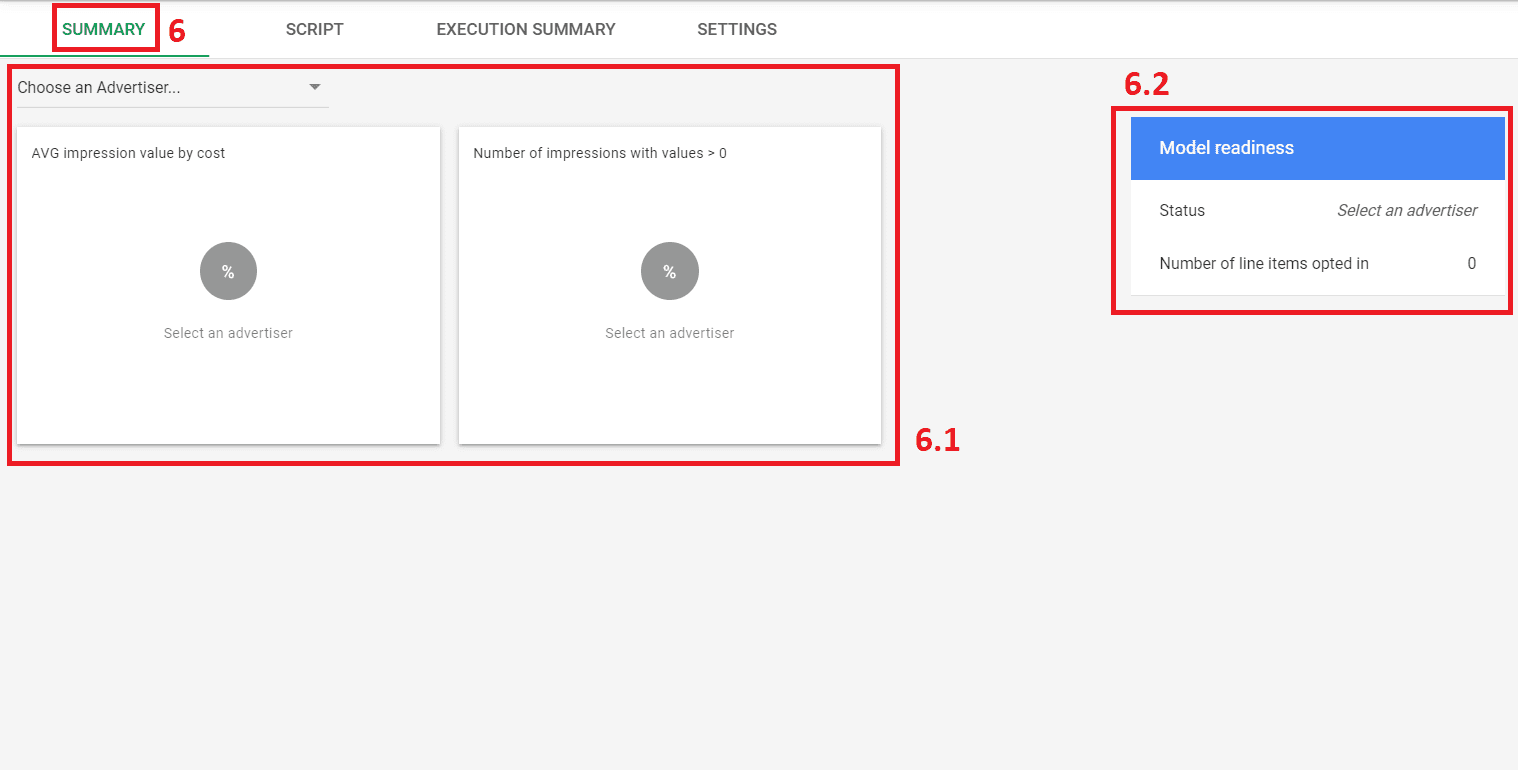
Tools
- In early 2020, Google made the custom bidding functionality available to everyone who has access to DV360.
Materials
- Depending on what clients you work with, there are different aggregate models that can be used to weight your end-actions. If you want to run a few sample custom bidding scripts, you can explore my ultimate guide to custom bidding in DV360.
Work with Lachezar
To connect with Lachezar, feel free to DM him on LinkedIn. As mentioned, you can also explore the complete guide to DV360 Custom Bidding.
2 comments
Do you have any sample custom algorithms to try?
Hey Yash, article is finally ready, here are templates and examples.
Comments are closed.